
Search Manual
RealBand® 2024 for Windows® User’s Guide
Chapter 4: The Main Screen
There are five parts to the RealBand main screen.
- The Status Bar shows information about the current project.
- The Menu Bar is where menus and commands are accessed.
- The Toolbars give information and access to program functions.
- The Windows area, the main workspace for all program windows (Tracks, Mixer, Chords, Notation).
- The Piano Keyboard displays, and can input, MIDI notes.
- Additional Toolbars to control playing or recording.

Status Bar
![]()
The status bar is the colored header across the top of the screen.
RealBand shows the file name for the currently loaded song in the status bar. It also shows the song title if the song has been given one, and the name of the current window, e.g., Chords, if the window is maximized. When the jukebox is playing then Juke Box mode is displayed in the status bar.
|
The buttons to minimize, maximize, and close the program appear at the right side of the status bar. |
Menu Bar
![]()
Like most Windows applications, RealBand has a pull-down menu interface. The menus list many operations that can be controlled with key strokes. These can save time and it is a good idea to memorize the ones you use regularly.
Toolbars
There are two background color and icon set for the toolbar. Go to the menu Options | Icon Set and select Classic or Modern.

The toolbar buttons are arranged in groups according to function. You can select a background color and icon set.
![]()
![]()
![]()
![]()
![]()
![]()


File Area
![]()
|
This will clear the current song from memory so that you can start a new song. If you have made changes to the current song, RealBand will ask you whether or not you wish to save the file before clearing the file from memory. |
|
This will open a dialog which allows you to choose a file from the disk. You can open .MGU, .SGU, .SEQ, .MID, .KAR, .WAV, .MP3, .WMA, .WMV, .CDA, or a .DP file. |
|
This will save the current song to the disk. If the song has no name (untitled), the standard Windows 'Save As' dialog will pop up , so you can choose a file name and format (e.g., .MID, .SEQ, or .DP). |
|
This is similar in function to the [Save] button except that it always displays standard Windows 'Save As' dialog. You to choose the name of the file, directory, and file type (.SEQ, Type 1. MID, Type 0 .MID, .KAR. or .DP) |
|
The Batch File Conversion feature converts a group of files in a folder over to another file type. All of the most popular audio file types are supported, as well as RealBand .SEQ files, Band-in-a-Box files, and MIDI files. |
|
This will display a menu that allows you to save tracks as a file. You can choose to save as a stereo WAV file, compressed file, WMA file, or individual file (WAV/MIDI). |
Tools Area
The buttons of this group control the editing features.

Views Area
The buttons in this area allow you to see various windows.

|
This opens the Tracks window. This window has 256 tracks, each of which can be designated as a MIDI track, a mono audio track, or a stereo audio track. |
|
The Chords window displays the chord symbols of a song. You’ll see the bars of the song displayed in rows. |
|
The Mixer window is a graphical mixer that lets you control the 256 tracks in RealBand. |
|
The Bars window shows the bars (or measures) of the song. Bars with MIDI data will be shaded, while bars with audio will show the audio waveform in miniature. |
|
The Tempo Map is a list of all the tempo changes that occur during the course of the song. |
|
The Meter Map is a list of all the meter changes that occur during the course of the song. |
|
This will launch the Video window, which lets you load and play a video, as well as import the audio into RealBand. |
|
The Notation window displays the notes of a MIDI track on a staff and lets you print music on your printer. |
|
The Audio Edit window shows audio data as a waveform. Select a region to edit by mouse clicking on the waveform and dragging the mouse to the right. |
|
The Guitar window displays notes played in the current track or MIDI Thru on a guitar fretboard. |
|
This will launch a resizable Big Piano window. |
|
The Piano Roll window allows editing of MIDI notes and graphic editing of controllers. |
|
The Big Lyrics window displays any existing lyrics in a track. The lyrics highlight and scroll, great for singing along. |
|
The Lead Sheet window is similar to the Notation window, except that it can display multiple staves. |
|
The Event List window is an event editor that lets you insert, delete, or change MIDI events. |
Perform Area
![]()
|
This will play the previous song in the Jukebox play list. |
|
This will let RealBand play a list of songs as a jukebox mode. In the Jukebox dialog, you can choose which songs to be played. |
|
This will play the next song in the Jukebox play list. |
|
This opens the Conductor window for live playback and looping control. |
MIDI Area
![]()
|
This will open the MIDI Driver Setup dialog, which allows you to choose the MIDI input and output drivers to use with RealBand. |
|
This will open the VSTi/DXi Synth Panel together with the control panel for your VSTi/DXi synthesizer. |
|
This launches the MIDI Monitor, which displays a list of MIDI events. This is useful for diagnostic purposes or education about MIDI messages. |
|
The Drum button launches the built-in 3-D animated Drum Kit plug-in. |
|
The SysEx window is a built-in system exclusive (SysEx) librarian to transmit or receive SysEx data. |
|
This attempts to shut off any hung MIDI notes by sending out an 'all note off' message to your MIDI or soft synthesizer. |
Help Area
The buttons in this area will start your internet browser and show you various support pages.
![]()
Audio Area

|
This will open the DirectX/VST window. You can apply DirectX and VST effects in real time to the audio tracks without permanently altering the actual track data. |
|
This will launch the Audio Chord Wizard. Audio Chord Wizard automatically figures out the chords from audio files (WAV/MP3/WMA/SEQ). |
|
This allows you to generate audio harmonies. |
|
You can import an audio file into the current track. If you are importing a multi-track .WAV file, you will have choice of merging to a mono or placing additional track of the .WAV file onto separate tracks. |
|
This will export the selected or the whole of the current audio track as an audio file (WAV/MP3/WMA/MP4/M4A). |
Markers Area
The buttons in this group allow you to insert or delete markers, go to the previous/next markers or open the Markers window.

Utilities Area

|
This will open the Preferences dialog. Most program settings and options can be accessed from this dialog. |
|
This launches the Guitar Tuner, which lets you tune a guitar or other instrument plugged into the mic-in or line-in of soundcard. |
|
This opens the Big Clock window, which displays the current time location in large texts. This window has three display mode - 'Measures:Beats:Ticks,' or 'Hours:Minutes:Seconds:MS,' and 'Samples.'. |
|
This will attempt to remove the older .DG files that were named using shorter file names but are identical to the newer files with longer names. |
|
The CPU Usage Indicator shows total CPU usage and RB (RealBand) usage |
Song Panel
This area allows you to control settings such as title, style, time signature, key, and tempo, as well as generating tracks.

The title is typed in to the title window as regular text.
![]()
|
The [Style] button allows you to open a style. Clicking the lower part of the button will show you the menu that lets you open a style from the StylePicker, the Windows’ ‘Open’ dialog, or ‘Band’ styles. The menu also let you choose the default action of the upper part of the button. |
![[Style] button menu](images\4\rb2024full_126.jpg)
|
The key signature of the song is set by double clicking in those boxes to open the Key Signature dialog. |
|
This dialog has options for transposing the song’s MIDI tracks, audio tracks, or both to the new key. “No Transpose” changes the key signature for notation but does not affect the tracks. |

|
Double click the mouse in this box to open the Meter dialog. Odd time signatures such as 5/4, 7/4, 9/16, 11/4, etc. are supported. |

|
These buttons allow you to change the current tempo. |
|
You can double click on Tempo box to open the selection dialog. |

|
The tempo can also be adjusted with these buttons. Hold down the up or down arrows to scroll the tempo up or down, or click on the arrow to increase or decrease the tempo in single increments. |
|||
|
Click on his button and type a percentage (12% - 200%) to set a relative tempo. 12% would be 1/8 of original tempo and 200% would be twice the original tempo/to se any value |
|
Tap tempos with the minus [-] and equals [=] buttons. Tapping on the minus sign four times will set the tempo just as if you had counted it in. Tapping on the equals sign four times will set the tempo at the average speed you tapped and then automatically begin song playback at that tempo. |
|
You can slow down and/or transpose any song or sequence in real time by using this button. With the high quality Elastique tempo and pitch shifting, this allows you to slow down or transpose over extreme ranges with great quality, which is a big help for learning or transcribing music, from audio or video |
||
|
These buttons set the beginning and end of the song chorus, which particularly affects how endings are played. Double click on the button to open a selection dialog. |
|
If this is enabled, 2 bar ending will be generated. |
|
This affects lead-in generation. If this is set to -2 (or any higher negative value such as -3), then the song will be generated with 2-bar lead-in. |
|
The [Song Set] button opens the Song Settings dialog with options that apply only to the current song. |

![]() This button opens the Comments Window which allows you to edit or view comments.
This button opens the Comments Window which allows you to edit or view comments.
These settings controls how the song arrangement is generated. It is possible to generate the complete song or just a selected range.
|
When you are ready to generate an automatic arrangement, press this button and select an option from the popup menu. |
|
Generate All BB Tracks generates new Band-in-a-Box tracks using the current style. Select and Generate RealTrack opens the RB Assign RealTracks to Tracks dialog for Real instrument selection and options for the generation of the audio RealTrack. If Also Generate RealChart is checked, a RealChart (notation) will be generated when a RealTrack is generated. Select and Generate RealDrums opens the RB RealDrums Picker for selection of a RealDrums style and options for the generation of the audio RealDrums. Generate MIDI Track opens a list box to select the part for a MIDI track to be generated on the current track. Freeze Track from Generation: You can “freeze” a track, which prevents it from being regenerated by functions like re-generate all tracks. Regenerate Track will regenerate an existing track. If a track is a non-BB track, but it was generated individually from one of the generation options in Tracks window popup menu, or from one of the generation options on the Generate Button popup menu, then the track name will be displayed in green. Regenerate All will regenerate all Blue and Green tracks automatically, including RealDrums. |

The Piano Keyboard

The re-sizeable piano keyboard is located below the Track Window. The piano can be “played” by clicking with the mouse, either while a song is playing or when it is stopped, and clicking on a note while in Editable Notation mode enters that note in the selected track at the current time location.
There is a 1-peg hot key in the Notation window to move current time forward or backward by 1 peg (normally a 16th note). Alt+left arrow moves the current time backward by 1 peg. Alt+right arrow moves it forward by 1 peg. This makes it easier if you are using the on-screen piano for entering notes into the Notation window.
The on-screen piano also responds to mouse clicks if the current track is an audio track. This is useful if you want to hear a note played as a reference without having to change the current track to a MIDI track.
![]()
![]() The Piano Settings are found under the Piano tab in the Preferences.
The Piano Settings are found under the Piano tab in the Preferences.
They include settings for the display mode and the size of the keyboard.
|
When the display mode is set to “Current Track,” the piano will display notes as they are being played from the current track. If the display mode is set to “All notes except for drum channel” the piano will display notes that are played from all the tracks except for notes that are on the drum channel. When the “Big Sizeable Piano” setting is enabled, RealBand will show a bigger piano. For the Big Sizeable Piano, there is also a setting that gives you a choice of Show Track Number (drawn as a tiny number within the notes), Show MIDI Channel, or Show No Text. |

If “Big Piano Varies Colors By Track” is enabled, then the colors of the notes drawn on the big piano will vary depending on the track number. For tracks 1 through 10, RealBand uses 10 different colors, then repeats these colors for higher track numbers.
![]()
These settings are automatically saved to RBW.INI and RB.CFG so that they will remain in effect the next time you use RealBand.
Transport Area
This area allows you to control playback or recording.
![]()
|
This sets the current location to the start of the song. |
|
This rewinds the song. |
|
This stop playback or recording. |
|
This plays the current song. |
|
This fast forwards the song. |
|
This sets the current location to the end of the song. |
|
This lets you record from the current location on the current track. Clicking the arrow button will display a menu with options to Record (from the current location), Record From Start, Record Audio, and Step-Record MIDI. |
|
This will display a menu with options to enable/disable punch-in record and open Punch-in Record dialog. When the punch-in is enabled, recording will take place in the region and overwrite any existing data. |
|
This will display a menu with options to enable/disable metronome during Recording and/or Playback and open Metronome Settings dialog. |
|
This will display a menu with options to enable/disable endless loop and open the Loop Settings dialog which allows you to set the loop range. When loop is enabled, the button will be highlighted. |
Time and Selection areas

![]() The song location slider moves directly to a new place in the song.
The song location slider moves directly to a new place in the song.
![]() This is the current location in MIDI format - bars:beats:ticks.
This is the current location in MIDI format - bars:beats:ticks.
|
The “From” and “Thru” values indicate the range of bars currently selected for editing operations. You can double click in these fields to type in new locations. |
When From: and Thru: are set to the same value RealBand always generates a complete song. If they are set to different values RealBand will generate that specific range.
Levels Area
This area allows you to control volume.
![]()
Windows
Most of the main screen is used for the windows workspace. There are many window views to choose from and you can open as many as you wish to. The Tracks window is the default view.
Tracks Window
The Tracks window shows the track names, track type (MIDI or audio), instrument settings, and an overview section showing either MIDI or audio data.
The Tracks window shows the track names, track type (MIDI or audio), instrument settings, and an overview section showing either MIDI or audio data.
![]() The Track Number field shows the track number. If the track is the current Track it will be highlighted in red.
The Track Number field shows the track number. If the track is the current Track it will be highlighted in red.

If the track is selected the number will be highlighted in yellow. If the track is not selected it will be gray. You can click on the track number field to make a track the current track (highlighted in red).
If you click on the track number field while holding the Shift key, this will select a range of tracks from the current track through the number you clicked on. For example, if track 2 is the Current Track, and you hold the Shift key and then click on the number field for Track 4, this will make tracks 2 through 4 selected. Track 2 will still be the Current Track and tracks 3 and 4 will be highlighted in yellow. You can select/deselect individual tracks by clicking on a Track’s number field while holding down the Ctrl key.
![]() The Disclosure Triangle will reveal more information about a track by making the track row height taller.
The Disclosure Triangle will reveal more information about a track by making the track row height taller.

|
If a track is a MIDI track, then you’ll see the Vel (velocity offset), Rvb (reverb), Mod (modulation), Loop, Key (key transpose), Cho (Chorus), and Exp (expression) settings. |
You can make changes to these settings by clicking on the edit fields with the left mouse button, and then moving the mouse up or down while holding the mouse button down. The [Edit DXi] button launches the DirectX Window dialog and will display the settings panel for either the Default DXi Synth (16th DXi synth slot which is MIDI port 32) or the current DXi port number if the track is set to a valid DXi port (17-32). Any track’s MIDI Output Port can be set to send to one of the 16 available DXi synth ports or to any other available MIDI port.
 |
When you right-click your mouse on a MIDI icon you’ll see a pop-up menu that lets you set the MIDI Output Port, Program (Patch) setting, and Bank (MSB) and Bank LSB settings. Immediately below the Port: menu item is a menu command that lets you Set All Midi Tracks to the same port used by the track you are adjusting. There is also a menu item Patch Select Dialog that launches a patch selection dialog, which lets you select patches and variations as well as allowing you to change the track’s patch list. If the patch list is set to General MIDI, Roland GS, or Yamaha XG, the track will display an instrument icon corresponding to the patch. Otherwise, you’ll see the patch number displayed instead of an icon. |
The Track Name field shows the track’s name, which is edited by right-clicking or double-clicking on the track name field. Type the name and press Enter.
|
|
When using the General MIDI patch map the program will automatically display an icon for the instrument selected. |
|
The Mute button lets you mute or unmute a track. Green indicates the track is playing, red is mute. |
|
Click on the solo button(s) to solo one or more tracks. Bright yellow shows that the track is soloed. |
|
The [fx] button launches the dialog to choose VST/DX audio effects or MIDI synths for the track. If any effects or synths are assigned the [fx] button will be blue. |
|
The Volume and Pan sliders let you adjust a track’s volume and pan settings without opening the Mixer window. Right-clicking on the Volume or Pan controls will let you edit the setting by typing in a number. |
|
Below the Volume slider stereo VU meters give you a general idea of a track’s level during playback. |
|
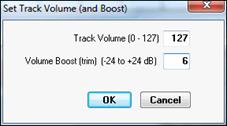
Frequently, when you are making a mix, adjusting a track's volume to the maximum still doesn’t make the track loud enough relative to the other tracks. This means that you have to either apply a gain effect or reduce the other track's volumes, which is time consuming. We’ve added a simpler method, which is to allow settings higher than 127. Simply right-click on the volume slider, and enter a “Volume Boost” (from -24 to 24 dB), and this will apply to any audio track, or any MIDI track that uses a DXi or VSTi synth! |
Track Overview Display
Automatic track color for Tracks Window
- The track colors show different shades for odd/even track number, making the tracks stand out.
- The track color for RealDrums is yellow.
- The colors for user-generated MIDI/RealTracks/RealDrums tracks have slightly different shades.
- The track color is red during actual recording.
- The track colors for Loops and UserTracks used to be the same but now Loops track is purple and UserTracks track is pink.

To the right of the track info panels, you’ll see the overview display.
![]()
This lets you view MIDI or audio data, and select sections for editing. You can select a region of the song during playback.

You can click and drag to highlight a section of the song for editing.
◄ Left and right ►cursor arrow keys will move the current time forward or backward by 1 beat.
![]() ►
► ![]()
If the Alt key is held when left-mouse clicking on the overview section of the Tracks window the time will be changed without affecting the currently highlighted region. This lets you quickly adjust the current time without having to worry about accidentally changing the highlighted region.
![]()
![]() Click on [Play Region] to hear the highlighted section being edited. Holding the Alt key while pressing this button will play the selected area of the current track regardless of whether the track was muted or not.
Click on [Play Region] to hear the highlighted section being edited. Holding the Alt key while pressing this button will play the selected area of the current track regardless of whether the track was muted or not.
![]() The [-] and [+] buttons let you zoom in or zoom out the overview section.
The [-] and [+] buttons let you zoom in or zoom out the overview section.
![]() The [Snap to beat] button causes the time indicator to snap to the nearest beat when changing the time location or when highlighting a region for editing.
The [Snap to beat] button causes the time indicator to snap to the nearest beat when changing the time location or when highlighting a region for editing.
Ctrl+Space Bar command will loop the highlighted region of a song (or whole song if nothing is currently highlighted).
Click and drag to highlight a section of the song for editing. You can select a region of the song during playback.
- If you Shift+click before the start of the From/Thru range, or after the end of the From/Thru range, the highlighted area will be extended.
- If you Shift+click within the From/Thru range, the range will be reduced, and the location you clicked on will become either From or Thru depending on which boundary was closer to where you Shift+clicked the mouse.
- If you keep the left mouse button held after the Shift+click, and you move the mouse you can adjust the boundary of the range while moving the mouse.
Right-click Menu for MIDI Tracks
|
If a track is a MIDI track, and you right-click on the track you’ll see a pop-up menu that lets you set the MIDI Output Port, Channel, Program (Patch) setting, and Bank (MSB) and Bank LSB settings. |
This menu will also open with a left click on the track type icon if “Left click on track-type icon in Tracks Window shows pop-up menu” has been selected (checked) in the Options | Preferences | General dialog.
There are 32 MIDI Output ports. You can think of each of port as route that the track takes to output sound, whether through an onboard sound card, software synthesizer, or an external MIDI keyboard or sound module.
The first 16 ports are for either onboard synthesizers or external MIDI I/O connections. Ports 17 through 32 are for DirectX (DXi) or Virtual Studio Technology (VSTi) instruments. Mouse over the Port menu item to see a list of all available ports.
At the bottom of the Port submenu, there are additional menu items:
|
Load DXi/VSTi Synth into unused Slot loads in synth into the next available slot (port) and automatically assigns the track to that port. However, if the synth is already loaded into a port, it will assign the track to that port rather than loading another instance of the same plug-in. So this command is basically the same as “Specific Synth for MIDI track.”
Current Track Event Colors / Default Track Event Color Setup: You can apply a custom color (foreground and background) to a track, or all tracks, using right-click menu items “Current Track Event Colors” and “Default Track Event Color Setup.” |

Right-Click Menu for Audio Tracks
![]() If a track is an Audio track and you right-click on the track, this pop-up menu opens. This menu will also open with a left click on the track type icon if “Left click on track-type icon in Tracks Window shows pop-up menu” has been selected (checked) in the Options | Preferences General dialog.
If a track is an Audio track and you right-click on the track, this pop-up menu opens. This menu will also open with a left click on the track type icon if “Left click on track-type icon in Tracks Window shows pop-up menu” has been selected (checked) in the Options | Preferences General dialog.
The Track Type and audio Port settings can be assigned.
Open DX/VST Plugins Configuration opens the DirectX/VST Window where plug-ins can be applied and edited.
The Track Category item lets you select preset groups of audio effects for the particular category such as guitar, vocal, keyboard, or your own user assigned effects groups.
Make a New Audio Category opens a dialog where you can name a new category, select an image for its icon, and assign an audio effects group (*.TGS) preset.
Generatehas menu commands for generating various types of tracks.
|
Select and Generate RealTrack opens the RealTracks Picker dialog to select a RealTracks instrument and generate a RealTrack. Track names for generated non-BB tracks are displayed in green. For example, if you had generated a track by right-clicking on it and selecting “Generate RealTrack” then the track name of that track will be displayed in green. |
Time Stretch and Pitch Shift is a dialog that lets you stretch (or reduce) the length of the highlighted section of audio tracks.
Select Whole Track command will select the entire track for editing.
Kill Selected Region will deselect a selected region of an audio (or MIDI) track.
Change Current Time will change the current time without affecting the highlighting of tracks. This ensures you don’t accidentally de-select a region.
Highlight Current Audio Event makes it easier to select specific audio events, which then could be clicked and dragged (with Ctrl button held down) to a new location, etc.
Copy/Move Current Event (selection) launches the Drag/Drop Edit dialog.
Current Track Event Colors / Default Track Event Color Setup: You can apply a custom color (foreground and background) to a track, or all tracks, using right-click menu items “Current Track Event Colors” and “Default Track Event Color Setup.”
Save Audio Track (or selection) as wav/wma/mp4/m4a/mp3 lets you export a track or a section of a track to a separate audio file in one of the available formats. Some formats, such as MP3, require a proprietary codec that may not be present on your system.
Import Wave File allows you to select an audio file and insert it into either a highlighted section of a track or the whole track. This duplicates the File | Audio | Import Wave File command (Ctrl+F3) and allows you to import a wave file without to need to go to the Audio menu.
The Cut, Copy, Paste, and 1-Track Paste commands apply to the highlighted section of a track(s). The functions are as described in the Edit Menu topic.
Deleteremoves the selected section or events.
Copy/Move highlighted area of current track to another track makes it easier for “comping” which is to create a track that is a composite of different takes/tracks. It's a quick way to move/copy to a destination track without having to first cut/copy and then paste
Grid lines allows you to change the resolution of the grid lines.
Insert Volume Change will insert a MIDI controller into the track at the current location. If a highlighted region exists, then the program will ask if you want to apply this change to the highlighted region (as opposed to a change at the location you clicked). If applying the change to a region, then program will insert a volume change at the beginning of the region, and a 2nd volume change at the end to restore the prior volume. If necessary, the program will insert a controller at the very beginning of the song to preserve the original volume if you insert a volume change beyond the start of the track. This will normally be done the first time you insert a volume change into a track beyond the tracks’ beginning.
Adjust overall volume of selected area using gain nodes allows you to increase or decrease the volume of the selected area of a track by using gain nodes, without having to manually enter them in the gain node area of the track.
Fade-in or fade-out using gain nodes allows you to fade-in or fade-out a section using gain nodes, without having to manually enter them in the gain node area of the track.
Audio Effects opens a submenu that is the same as the Edit | Audio Effects window. This submenu also contains Fade In and Fade Out menu items, which launches a Flash Message w/ instructions, and then launches the GAIN dialog.
Drag and Drop Features
RealBand supports drag-and-drop editing in the Tracks and Audio Edit windows.
In the Tracks window you can easily move tracks up or down in relation to each other by drag ‘n’ drop using the mouse, e.g., drag track 1 below track 2 to change the order of the tracks.
You can move a highlighted region by holding down the Ctrl key with the left mouse button pressed, and drag the region to a new location in the song.
When you drop to a new track (or the same track), a dialog appears with options to move or copy.

This is called the Drag/Drop Edit dialog:
- If nothing is selected, and you Ctrl+click to drag and drop, it will assume that you want to drag the entire current audio event.
- Bypassing the dialog for quicker workflow. If you hold Ctrl+Shift then the drag will move the current event. If you hold Ctrl+Alt then the drag will copy the current event. When Dragging/Dropping within the overview section of the Tracks window, you can now drop to a blank track even if the track type wasn't originally set to the correct track type.
- Drag/Drop will automatically be set to the original time if within 20 ticks (at a PPQ of 120). So if you drag a region down to a new track, you just need to be “approximate” in the drop location, as the program will snap the time to the same time as the event on the source track. If you don’t want that behavior, just Ctrl+drag the selection, and the dialog appears with exact values. In this case, the dialog also has a handy “Set Drop Time to Drag Time” button.
- The Time field has been added to the Drag/Drop Edit dialog, so you can fine-tune the time for the drop when you drag a selection using Ctrl+drag.
- Destination Track # added to Drag/Drop Edit dialog when launched from the Tracks window.
- [Set Drop Time to Drag Time] button has been added to the Drag/Drop Edit dialog
- Copy/Move Current Event (selection) menu item added to the Tracks window right-click menu
- When dragging/dropping within the overview section of the Tracks Win, you can now drop to blank track even if the track type wasn't originally set to the correct track type.
Drag And Drop MIDI Or Audio Files Into The Tracks Window
You can drag a file, such as a .WAV file, from a folder directly onto the Tracks window. The file will be placed on the track you dropped it on, at the location onto which you dropped the file. The types of files that are supported are the audio files supported by RealBand, such as .MP3, .WAV, and WMV.
In addition to audio files, .MID files can be dropped onto the tracks window too. If the file is a multi-track .MID it will be imported onto free tracks beyond the highest occupied track.
If you hold the Ctrl key when dropping the file, then the file will be inserted at the time location, and any existing data moved beyond the end of the file that is being inserted, rather than overwriting any existing data.
Classic Tracks View

Click your mouse anywhere on a row to select that track. The number of the currently selected track (Tr) is highlighted in blue.
Ty = Type. |
The type field determines the track type: MIDI, Mono Audio, and Stereo Audio. You can’t change the track type if a track already has data in it. |
P = Play Status. |
The Play Status field shows the status of the track as Play (P), Muted (m). |
Name = Track Name. |
This is any name you want to give to the track. |
Ch = Forced MIDI channel. |
When not set to zero, all events in a track will be sent out over the selected channel. |
Key = Forced Key Transposition. |
This setting transposes the events in a track up or down by the number of semitones you specify. |
Vel = Forced Velocity transposition. |
This setting increases or decreases the velocity of the notes in a track by the amount you specify. |
Pt = Port. |
Determines the MIDI port, or audio port, through which the data in a track is sent out. |
Prg = Program change. |
When this setting is enabled a MIDI patch change will be sent at the start of the song. When you change this setting, a MIDI program change is sent. |
Bank = Bank change. |
This is the MSB (Most Significant Byte) portion of the bank change, controller number 0. |
LSB. |
This is the Least Significant Byte (controller number 32) portion of the bank change. Some synths use LSB instead of MSB, and some synths use a combination of the LSB and the MSB. |
Loop. |
When this setting is enabled, the track will automatically repeat for the number of times specified. |
Events. |
The number of events in a track. |
Editing Fields within the window: The following fields may be edited by moving the cursor over the particular field you wish to edit and then pressing ENTER, or by double-clicking the mouse while over the field. Numeric fields may be increased or decreased by pressing the +/- keys.
Name: The name of a track.
Events: The number of events in a track.
Ch: Forced MIDI Channel. When not set to 0 all events in a track will be sent out over the selected channel.
Key: Forced Key Transposition. This setting transposes the events in a track up or down by whatever amount you specify. For example, “-12” will transpose down by 1 octave.
Vel: Forced Velocity transposition. This setting increases or decreases the velocity of the notes in a track by whatever amount you specify.
Pt: MIDI Port. This setting determines which MIDI port the data in a track is sent out. If the port selected is greater than the number of available output ports the events in the track will be sent out the highest available port. For example, if only one port is available and you select port number 2, the events will be sent out of port number 1.
Prg: Program Change. When this setting is enabled a MIDI patch change will be sent at the start of a song. When you change this setting a program change will be sent out via MIDI. This is convenient for “auditioning” sounds during playback.
Bank: Bank Select. This will send a bank select message, followed by the track’s current program change setting. Some synthesizers have more than 128 patches. The additional patches can be accessed by sending a bank select message, which will cause the synth to switch to a different bank of patches. See also the Options | Preferences | MIDI | MIDI Out command.
Loop: Loop MIDI Track. When this setting is enabled, a track will automatically repeat for the number of times specified. The track will loop back to the start of the measure that contains the first event in the track. If this setting is set to zero, the track will not be looped.
Markers Window
This window lets you insert markers in the song for keeping track of various sections of your music.
 When markers are inserted in a song, you can use the [Prev] and [Next] buttons in the Markers area on the toolbar to jump from marker to marker.
These markers will also appear (by default) at the top of the Bars window. You could use the markers to mark sections such as the verses and choruses of the song. The Ins and Del buttons allow you to insert or delete markers. You can change the current marker by editing it directly in this window.

The [Opt.] button will open a dialog with checkboxes for enabling or disabling the display of Markers and Bar Numbers at the top of the Bars window.

By default, both Markers and Bar Numbers are displayed. Since they are shown on the same line you can prevent either of these from being shown in the Bars window by unchecking the appropriate checkbox. If you uncheck the Show Measure Numbers in Bars Window checkbox the bar numbers will not be shown in the Bars window. If you uncheck the Show Markers in Bars Window checkbox the markers will not be shown in the Bars window. These options are provided in case you prefer just one or the other being shown in the Bars window.
Markers can be as close together in time or as far apart as you wish. Markers that are too close together will run into each other when displayed in the Bars window. In most situations such as marking verses and choruses of a song this isn’t a problem, but it is something to keep in mind when working with markers.
Chords Window
|
The [Chords] button or the keystrokes Ctrl+3 opens the Chords window.. |

The Chords window displays the chord symbols of a song. You’ll see the bars of the song displayed in rows. If a bar contains chord symbols, they will be displayed to the right of the bar number. An optional setting inserts a line between each section of the song, as determined by the “a” and “b” part markers. There is another setting for the thickness of the line.
When the song isn’t playing you can enter chord symbols by typing them. You enter chords in a similar manner to the Notation window, except that the Chords window is always ready for chord entry if the song is currently not playing.
Each measure is divided into Beat Groups. A Beat Group consists of two beats. If a song is in 4/4, then each measure will contain two beat groups. The current beat group will have a rectangle drawn around it. You can type two chords into the current beat group. For example if you type this: “c7,g7” (without the quotes) you’ll see the text you’re typing in the white rectangular panel on the toolbar. If you then hit [Enter] you’ll see the C7 and G7 chords appear within the current beat group, and the input rectangle will automatically advance to the next beat group. When you’re in the middle of typing chord symbols, you can use the [Backspace] key to correct a mistake.
The ¬Left Arrow and Right Arrow® keys let you move the input rectangle to a different beat group without entering chords. You can also click the mouse on a different beat group to move the input rectangle to a new location.
If you’ve attempted to enter chords within a beat group, and you’ve pressed enter and chords don’t appear within that beat group, this means that you have made a typing error and the text was not recognized. You should then use the left arrow key to go back and try again. It may be that the chord spelling is different than the spelling that RealBand recognizes for that chord. Look in the list of chords for the spelling recognized by the program.
You can highlight a range of cells for editing by clicking inside of a bar and then dragging the mouse to the inside of another bar. For example, if you click in the middle of bar 1, and then drag the mouse to the middle of bar 8, you will have highlighted bars 1 through 8. Shift+click will extend the highlighted area. This will select all the tracks of the song for editing.
You can cut and paste sections of the song by using the Edit | Cut (or Edit | Copy if copying instead of cutting) and the Edit | Paste command.
The [Opt...] button launches the Chords Window Options dialog.
|
The Bars Per Line setting determines how many measures will be drawn per line in the Chords window. |

Extra space between sections (pixels) sets the width of the line between sections between 0 and 100 pixels.
The Auto-Interpret Chords setting is useful in a situation where a file is loaded, but the file doesn’t already contain any chord symbols. If you set this to “Always,” then RealBand will always attempt to automatically interpret the chord symbols using the Chord Wizard. If set to “Ask First,” then RealBand will ask before attempting to automatically interpret chord symbols. If set to “Never,” then RealBand will just load the file without attempting to figure out the Chord Symbols.
|
BB Tracks can be generated using more than one style, with volume changes, and with repeats. In the Chords window, click on the bar where you want to make changes. The [Bar] button launches the Settings for Bar dialog, where you can specify the changes that you want to have happen at the highlighted bar. |
|
|
This button launches the Audio Chord Wizard, where you can automatically figure out the chords from audio files (WAV, MP3, WMA, SEQ) and write them to the Chords window. |
|
|
If you the [Loop] button on the toolbar is blue, RealBand will play the highlighted section in an endless loop. If no section is highlighted then the entire song will be looped. |
|
Part Markers
If you click directly on a bar number, the number will change into a Part Marker. There are two kinds of part markers: an “a” part marker (blue), and a “b” part marker (green). Clicking once on the bar number that currently has no part marker will set the bar to “a” part marker. Clicking again will set it to “b” part marker, and clicking again would set the bar back to having no part marker. |
With the New line for every section (part marker) setting enabled, a line will be inserted between each section that has been marked with an “a” or “b” part marker.
You can toggle the part marker type for a measure during playback. In addition, you can also toggle a part marker for the current measure by pressing the M key on your keyboard when the Chords window is currently active.
Chord Wizard
 |
Right-click in the Chords window to open this menu with Chord Wizard options. If you select MIDI Chord Wizard the program will automatically detect the chords in the song. If you’ve highlighted a range of bars, RealBand will only attempt to detect the chords for the highlighted range. |
If no bars are highlighted, RealBand will attempt to detect the chords for the entire song. You can use the Undo command if you want to undo this.
The Custom MIDI Chord Wizard will launch the Chord Wizard dialog, which lets you customize the settings for chord detection.

Bars Window
The Bars window is available in the Window menu or with the keystrokes Ctrl+2. This window offers an overview of multiple tracks of wave and MIDI data.
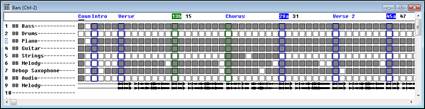
This window shows the bars (or measures) of the song. Bars that have MIDI data will be shaded, while bars without any data are not shaded.
At the top of the window, you will see either the bar numbers, markers, or both, depending on the chosen settings in the Markers window Marker Options dialog.
To the left of the window you will see the track names. If the whole track name doesn’t fit in this section, you will see it ending with “...” to indicate the name is actually longer than shown.
Bars that have MIDI data will be shaded. Bars that contain WAV data will be displayed as waveform overviews. Bars without any data appear as “empty squares.”
Left click with the mouse to set the current time location. To ensure that a previously highlighted region is not accidentally changed while setting the current time, hold down the Alt key when clicking the left mouse button.
You can use the mouse to select a region to be highlighted by clicking on a measure and dragging the mouse over the measures you are interested in. This action highlights an area that can be affected by the commands in the Edit menu.
The horizontal scroll bar located at the bottom of the Bars window allows you to scroll around through your entire project.
Tempo Map
The Tempo Map is a list of all the tempo changes that occur during the course of the song.

Tempo Map using Fill feature for a ritard.
The [Ins], [Del], and [Change] buttons shown above may be used to insert, delete, and change entries in the tempo map.
You may also insert tempo changes by pressing the computer’s Insert key. You can change the tempo of the currently selected entry by pressing Enter key or by double mouse clicking over the desired entry. The Delete key can be used to delete entries from the map.
If there is only one entry in the map you can’t delete it since at least one entry in the map is required in each project.
The Tempo Map window also has a [Fill] button that enables you to insert a series of ascending or descending tempo changes, highly useful for ritards and accelerandos.
The “From:” and “Thru:” fields displayed in the Fill Tempo Changes dialog allow you to specify the beginning and ending locations where you want the tempo changes to occur. The “Start Value” and “End Value” fields let you choose where, in terms of tempo, the fill will begin and end.
For example, if the start value is 100 and the end value is 90, a series of tempo changes starting at 100 and decreasing down to 90 will be inserted through the bars beginning with the “From:” location and ending at the “Thru:” setting.
SysEx Window
The SysEx window is actually a built-in system exclusive (SysEx) librarian.

This allows you to transmit or receive any SysEx data. You can also load and save MIDIEX compatible SysEx files. The SysEx librarian can hold up to 24 banks of system exclusive data. Since the librarian stores all data on disk as opposed to memory, the size of the SysEx data is limited only by the amount of free disk space available.
SysEx MIDI Events - you can insert System Exclusive data directly into a MIDI track as MIDI events in the Event List window. You can record SysEx data in real time and when you keep a take, the SysEx data will be added to a MIDI track as SysEx events. You could also load SysEx data into a SysEx MIDI event by receiving SysEx data from your synth, or by loading the SysEx data from a file. SysEx MIDI events can also be edited.
Receive: This command enables the ability to receive a data dump from your synthesizer to the currently selected bank. When you select this feature a message box will pop up to indicate that the sequencer is ready to receive the SysEx dump.
After you initiate this command you can press the appropriate buttons to dump the data from your synth. All the data received will be stored in the current bank in the program. A dialog box will show the progress of the SysEx dump, as shown below:

When your synth is finished dumping the data press the [OK] button to exit this window.
Transmit: Sends the SysEx data in a given bank out via MIDI. A dialog box will inform you that a send is in progress.
If you wish to cancel a transmission after it has started press the Cancel button and the transmission will be stopped.
Request: This option allows you to initiate a SysEx dump request by sending the request to your synthesizer via MIDI. Simply choose an instrument from the available names and press the Enter key. You may be prompted for the channel or patch numbers if the instrument requires them. After sending the request on the MIDI Out port the program will then proceed to receive any data that is sent from your synth automatically –as if the Receive command had been issued.
Load: This command will load a MIDIEX compatible SysEx file into the currently selected bank.
Save: This command will save the currently selected bank on disk in MIDIEX compatible format.
Name: Provides you with the option to choose the name for a current bank of SysEx data.
Auto: When this feature is enabled the bank will automatically be transmitted via MIDI when loaded from a .SEQ file. The letter “A” will appear to the right of the bank name if the bank is set to be Auto-Transmitted.
Port: This setting determines the output port through which the SysEx data will be sent out via MIDI. If the selected port is greater than the number of ports available, the data will be sent out the highest available port. For example, if the port setting for a bank is set to 2 and there is only one MIDI output port installed, the SysEx data in the bank will be sent out through MIDI Port 1.
Delete: This simply deletes the SysEx data from a currently selected bank.
Edit: For those who wish to manually edit the bytes of a selected bank, you can also type in this SysEx data as long as the bank currently has no data in it. A dialog box will pop up in which you can manually edit the bytes. The bytes are edited as hexadecimal numbers separated by spaces. The SysEx data will look something like this: F0 41 10 42 12 40 11 02 10 1D F7. Each SysEx message should start with F0 and end with F7.
The following is a list of the editing commands available for you to use when editing SysEx data:
Home |
Go to beginning of line. |
If you save a song to a .SEQ file the SysEx data will be saved within the file. However, there are a few differences in the way SysEx data is saved to MIDI files, since they must be saved as SysEx meta events. For example, if you save a file as a .MID the SysEx information will be saved, but the banks won’t retain their individual names when the .MID file is loaded back into RealBand.
If a bank has multiple SysEx messages in it (such as a bulk dump), each individual SysEx message is saved separately into a MIDI file. If more than the maximum number (24) of SysEx meta events are read from a MIDI file into RealBand the additional banks will be added to bank number 24.
If you save a file called $OPTIONS.SEQ, RealBand will automatically send any SysEx banks with “Autosend” (“A”) enabled in that file. This is useful if you want to have default SysEx data sent to your synth or sound source each time the program is started.
Dump Request Macros
A Dump Request Macro (DRM) allows you to initiate a data dump of your synth from the program instead of having topress buttons on your synth. A DRM file contains the name of a synth (names appear in a pick window when you select the Initiate Dump Request command), and the appropriate packet of bytes can be sent to your synth, which will instruct it to auto-send a data dump.
When you use the Initiate Dump Request command, RealBand reads the dump request macros from a binary file called RB.INS. The binary file RB.INS is converted from a text file called RB.DRM, which contains the macro information in ASCII format.
If you have a synth that isn’t listed in the RB.DRM file it is possible for you to manually add your own macro for your synth. These macros are derived from the System Exclusive Implementation information in your synthesizer manual.
Big Lyrics Window
The Big Lyrics window opens with the [Lyrics] button on the toolbar. It displays any existing lyrics in a track. The program will highlight the lyrics as they play, which is very useful for singing along with the music.

Various settings for this window can be changed in the Lyric Window Options dialog, which is launched with the [Options] button in the Big Lyrics window. These options can also be found in the Options | Preferences menu’s tabbed dialogs.
|
This lets you adjust various settings for the Big Lyrics window. The “Text Color,” “Background Color,” and the “Highlight Color” all can be changed if you don’t like the colors that the window is using. |

Clicking on a lyric or chord symbol in the Big Lyrics window will start the song from the location of the lyric or chord that you clicked on.
The [Find Lyrics] button automatically sets the Big Lyrics window to the track with the most lyrics.
Big Clock Window
|
This is accessible from an icon on the toolbar (same section of the toolbar that has the Tracks, Bars, Chords buttons, etc.). |
This window displays the current time location in a large text. It will show Measures:Beats:Ticks, or Hours:Minutes:Seconds:Hundredths, or Samples. Clicking on the window will toggle the display mode.
Measures:Beats:Ticks

Hours:Minutes:Seconds:Hundredths

Samples

If you resize the window, then the size of the font will adjust to the new window size.

Guitar Window
The virtual guitar fretboard displays the notes of any track or group of MIDI channels.
The virtual Guitar window displays notes (as green squares for fretted notes, and blue squares for bends) that are played in a selected track or by the MIDI Thru channel on the virtual guitar fretboard.

Pitch bends are displayed in real time as blue lines extending in the direction of the bend. If the direction is up, then line extends higher on the neck than the original note. If the direction is down (such as if a pull-off were executed), then the bend extends lower on the neck.
The pitch bends, shown as horizontal blue lines, will move horizontally along the string in real time illustrating the extent of the pitch bend.

Example of a MIDI pitch bend from a B to a C#
This virtual instrument works in the same fashion as the piano keyboard display. However, given that there are six separate strings on the guitar fretboard – and that many notes and chords can be played several different ways on the guitar, there are a few additional settings unique to this instrument.
Just below the fretboard you will find position markers. The current position setting of the guitar is highlighted in reverse video. The positions range from 0 (open) to 24 (24th fret). There is an additional position called “All,” where the MIDI notes will be displayed in all possible ways on the guitar. When the position is set to any other range (e.g., from 0 to 24), the notes will be displayed in that position, unless they are outside the range of a given position, in which case they will not be shown. You can change the position simply by clicking on any position marker (e.g., 1, 3,5,7,9, etc.).
The [Insert Position] button causes the currently selected position to be embedded into the track at the “Now:” location. When you play back a track with embedded position information the guitar position will correspondingly change when the position event is encountered. A position event is stored in the track as a MIDI Controller parameter (number 84) with a value ranging from 0-24 (indicating positions 0-24). A controller #84 value of 127 indicates the “All” position.
The ability to insert position information into a track is especially useful for properly displaying a track that was recorded by a MIDI guitar controller with all six strings set to transmit over one channel. By manually inserting this position information you can coax the guitar fretboard into displaying the notes in the position they were originally played, instead of having them display in all possible positions.
Try recording guitar music on a MIDI piano-keyboard, then insert the appropriate position information into the track, and watch the virtual guitar display the notes as if they had been played on a guitar.
Of course, the best way to record guitar music is with an actual MIDI Guitar Controller set to transmit over 6 separate MIDI channels (e.g., 11-16).
The Note Indicator is a white square located to the right of the [Insert Position] button. When you pass the mouse cursor over the guitar fretboard the name of the note that the cursor comes into contact with is shown in this white box. This can be used for getting to know the note locations found on the guitar.
The [<]backup and advance [>] buttons allow you to advance forward or go backward by one note at a time. The program will step-play the note that you have advanced or backed-up to. You can stop the note from sounding by advancing or backing-up to another note, or by pressing the [Stop]button. This feature is available so that you can hear and see a sequence of notes one-step-at-a-time. The keyboard shortcuts to backup and advance are the Shift+Left Arrow and Shift+Right Arrow keys.
The [¬] backup group and advance [®] group buttonswork in a similar fashion as the previously mentioned backup and advance buttons, except that these button allow you to see and hear a group or cluster of notes. Notes that are within a certain distance from each other (automatically determined by the program) are considered to be such a group/cluster of notes.
Keyboard shortcuts for the backup and advance group feature are the Ctrl+Left Arrow and Ctrl+Right Arrow keys. Additional hot keys available for this feature are the [0] and [.] numeric-pad keys, which can be used even when editing or viewing notation in the Notation window.
The [Settings] button offers a dialog that can change the following settings applicable to the Guitar window:

The Note Display Options checkboxes determines whether the Guitar window will display notes on the current/highlighted track (i.e. recorded MIDI data), or the notes echoed out via the MIDI Thru port (i.e. live MIDI-Controller data).
The purpose of multi-channel mode is so that when you play back a track that was recorded by a MIDI guitar controller in mono mode the notes will correctly display the notes in the virtual guitar. If a given note’s MIDI Channel falls outside the channel range (e.g., Channel 9), the program will attempt to use the position information instead to display the note correctly.
The Base Channel determines the guitar channel range when inmulti-channel mode. For example, with a Base Channel of 1 the channel range will be “1-6.” The highest possible base channel is 11 (the default), making the range “11-16.”
The Fretboard Color radio buttons let you choose between Brown and Black for the color of the guitar fretboard.
The Octave determines the range of notes that are displayed on the guitar fretboard. When set to 0, the fretboard will display notes normally. When set to “-1” for example, the guitar window can be used to correctly display bass lines instead.
|
The Guitar window can display fretboards for guitar, bass, ukulele, mandolin, and banjo. Select the instrument fretboard from the Fretboard combo box. Alternate tuning presets, such as Drop D, DADGAD, Open G, etc. are supported for the Guitar window and Notation Tablature. The Custom Tuning setting for the Guitar window lets you specify the number of strings (4 through 6) and the tuning of each string. Note: This custom setting does not support Banjo. |

Use the [Copy to Custom] button to copy the current string settings as a starting point for a custom tuning.
When you press OK, RealBand will save your custom settings, and then they will be recalled if you later switch to another fretboard and then return to the custom fretboard.
The String Tuning settingdetermines the range of notes that are displayed on each of the six strings. The default is Standard E Tuning. You can change the note value corresponding to the open note for each of the six strings. The guitar fretboard will appropriately display the notes as if they are played on a real guitar set to an alternate tuning.
The Send Notes To Notation Window setting, when enabled, offers the ability to insert a note directly into a Standard Notation window by mouse clicking on the appropriate note position on the virtual fretboard. Notes will be inserted at the current time/location of the opened Notation window.
The Show Notes at Aeolian Position setting, when enabled, will show guides on the guitar fretboard based on the current key of the song. For example, in the Key of C the Aeolian Position can be thought of as an A-Minor scale at the 5th Position (Aeolian Mode), with the root of the minor scale being on the 6th string of the guitar. Roots of the relative major scale are shown with orange circles.
The Show Notes at Phrygian Position setting, when enabled, will show guides on the guitar fretboard based on the current key of the song. For example, in the Key of C the Phrygian Position can be thought of as an A-Minor scale at the 12th position, with the root of the minor scale being on the 6th string of the guitar. We’ve named this the Phrygian Position since, in the Key of C, if you start playing a scale beginning at the E note on the 6th string at the 12th position it is actually a Phrygian Mode scale. You can also think of it as just another minor scale beginning on a 5th string. The roots of the corresponding major scale are shown with an orange circle.
The Note Names combo lets you choose between several options that affect the display within the circular guides on the fretboard. The default option is “Scale Tones,” which will display all the tones of the Aeolian or Phrygian scale. Other options are “None” (no notes shown), “Root Only,” (just the major scale root notes shown), and “Chord Tones” (just the major triad tones).
The Auto Set Position combo, if you chose to make use of this setting, will cause the program to automatically set the guitar fretboard’s current position to either the Aeolian or Phrygian position of the current key. By default it is set to “None” which means that the fretboard’s current position stays unchanged.
The Auto Set Octave setting, when enabled, will cause RealBand to automatically set the guitar octave by analyzing the MIDI data in the current track of the song.
The Use Index Finger Position setting when enabled causes the guitar display to use the “index finger” to play notes that are one fret outside of the normal position, instead of the little finger.
The Show Out-of-Range Notes setting, when enabled, will allow any note to be displayed on the guitar, regardless if it is the range of the guitar or not.
VU Meters
The Windows | Show VU Meters command will display the VU meters. There are 2 pairs of VU meters, one pair for audio input, and one pair for audio output. If you re-size the VU meters window vertically the height of the meters will expand or shrink to match the new window height.
|
The clipping indicator at the top of the meters indicates that clipping has occurred. You should try to keep the levels low enough so they’re safely below 0 db and the clipping indicator doesn’t light up. To be on the safe side, it’s probably a good idea to adjust the levels so that the meters don’t get too close to 0 db even if the clipping indicator hasn’t yet lit up. |

Other Program Windows
These program windows can be launched by selection in the Window menu or by clicking on their buttons in the Views Toolbar.

|
The menu command Window | Show Tools Panel gives quick access to the basic File menu and Edit menu commands. |
The Icon Row
![]()
There is a row of icons at the bottom of the main screen window. They give quick access to the most commonly used windows, and when you minimize any window it appears in the icon row, which makes it easy to restore when you want to work in that window again. Double click on the icon or use the standard Windows buttons to open a window from the icon row.
Unconditional 30-Day Money Back Guarantee on all products purchased from PG Music Inc.
PG Music Inc.
29 Cadillac Ave Victoria BC Canada V8Z 1T3
Sales: 800-268-6272, 250-475-2874,+ 800-4746-8742*
* Outside USA & Canada where International Freephone service is available.
Access Codes
Tech Support: Live Chat, support@pgmusic.com
 Online now
Need Help?
Customer Sales & Support
|
Phones (Pacific Time) 1-800-268-6272 1-250-475-2874 |
||
| Live Chat | ||
| OPEN | Online Ordering 24/7 |
|
| OPEN | Forums, email, web support |